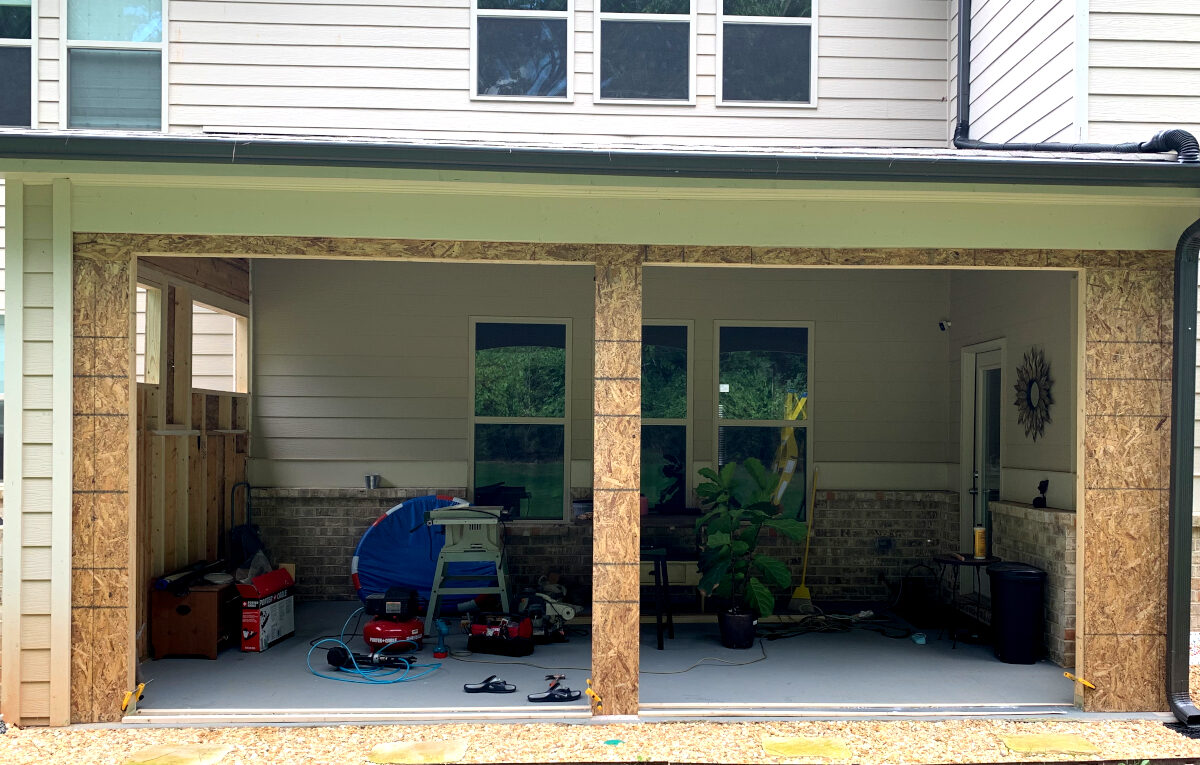
Week 3 was successful and we are ready to install the windows and doors next week!! This week of the project had three parts: adding the sheathing to the exterior walls, wrapping the exterior walls with housewrap, and building concrete sills for the sliding doors. If you’re just tuning in, be sure to read the previous posts for this project starting here.
Sheathing
Adding the sheathing to the exterior walls was pretty straightforward. I used a material called Oriented Strand Board (OSB) which is the most common and economical sheathing board available. To add the sheathing, you simple cut it to size and nail it to the outside of the framing. It did get tricky around the brick ledge next to the house because of all the many small cuts required. Overall though, we worked pretty quickly since all the sheathing would be covered up and didn’t need to be perfect. As long as the sheathing is secure and the openings are still the proper size, then you’re pretty much set.
The last part of the sheathing to do before moving onto the next step is to add some caulking. I used some exterior window and door caulking in all the seams where the sheathing meets the house. This provides an extra layer of protection to ensure water and bugs don’t get into the sunroom. It was especially important where the sheathing met uneven surfaces like siding and brick.
Housewrap
The next step may be simple, but adding housewrap is vital. This is the material that covers the sheathing and protects the structure to ensure it will last for many years. You just wrap the exterior sheathing with this stuff and ensure the top pieces overlap the lower pieces like shingles. Then you tape all the pieces together with a special tape. For now I left the top layer of housewrap that goes over the top of the windows and doors loose ad untaped. This is so that the housewrap can be lifted up to install the windows and doors. Then it will lay on top of the door and window flanges when they get installed. With this important housewrap placement, water will not seep in behind the windows and doors.
You also extend the wrap into all the window and door openings on the sides and bottom to protect the framing there. The final step is to tape all the seams to make sure there are no gaps in the housewrap. Again, don’t tape the top section yet until after the windows and doors are installed. I wasn’t sure of the requirements, but for good measure I also taped over the staples. I didn’t capture a picture of the sheathing wrapped in housewrap, but you will definitely see it next week.
Concrete Sills
The last step, which was a technical and physical challenge, was to build the concrete sills for the sliding doors. Remember how the floor is sloped to let the water drain out of the original porch? Well, I had to find a way to correct that slope so that the sliding doors would be level. I had to research quite a bit on what to do, how to do it and which materials to use. I knew I should first place wood pieces to both sides of the wall framing. Then I should fill in between with concrete to create the sills. The question I had was how to create those wood pieces at the right height and slope. I was able to piece the answer together by watching a few different videos, but this one was the key. Isn’t YouTube great!
Concrete Sills: Measure Framing
The solution was to place the wood piece in position on the concrete and raise up the lower end until it was level. Then use a tool called a scribe, which looks like a school compass, to draw the sloping line on the wood. My dad just happened to have one of these in his tool collection that he got from his dad.
First, you must set the scribe to the correct height in order for it to work in this application. To do that, you need to do some simple math. We needed the sill to be .5″ high on the left side of the opening to make the door opening 96″ tall. We were using a 2×4 and its thickness was the standard 1.5″. To determine the scribe height, you take the thickness of the board (1.5″) minus the height of the sill (.5″) which equals 1″. Then you take the scribe and run the metal point along the concrete and the pencil along the wood to draw the exact slope line of the concrete.
Concrete Sills: Cut Framing

Once you have scribed the line on the wood, you then carefully cut the wood along the line. This worked perfectly for us as the cut wood followed all the contours in the concrete and it was also level! Note that you use the top part of the board above the line. We repeated this process three more times until we had wood pieces for both the inside and outside of the framing on both door openings. We chose to cut the wood using a table saw because the resulting line wasn’t exactly straight (due to the concrete not being exactly flat). You could also use a circular saw or a band saw however.
Concrete Sills: Concrete Material
Now that I completed the sill framing, I needed to determine which concrete material to use. My research consistently pointed to use quick setting mortar as the best solution for this application. This mix creates hard and waterproof concrete which is exactly what I needed. The tricky part is that this stuff hardens in less than 5 minutes as the name suggests. This means I could not mix the whole bag of concrete and lay it in. That would take too long and the concrete would harden while most of it was still in the bucket.
Concrete Sills: Slab Preparation
Now before I could mix and lay the concrete, I needed to make sure it would stick to the slab floor. The builder painted it with epoxy and I wasn’t sure if concrete would adhere to it. The last thing I wanted was for these door sills to allow water underneath them into the sunroom. What I found in my research was a lengthy three step process that should do what I needed. The first step was to scrub the floor with a metal wire brush to roughen up the surface. Rose secretly snapped a lovely picture of me scrubbing the floor like Cinderella and frankly, no one needs to see that. The next step was to clean the brushed surface with trisodium phosphate which deep cleans the surface and improves adhesion. The last step was to apply some concrete bonding adhesive to the cleaned surface.
Concrete Sills: Pour Concrete

Finally, it was time to start adding in the concrete. I mixed about 4 cups of concrete at a time with cold water. Once mixed well I set it into place with a trowel and then ran over with a wet sponge to even it out. I repeated this process until the entire sill was poured. A good tip is to mix this stuff in the shade since the sun accelerates the setting process. I had bought a 25 pound box of Rapid Set Mortar Mix which was just enough for one sill, so I had to make yet another run to Home Depot to get more and finish this part of the project. Once the sill was poured, I sprayed it with water every few minutes ensuring it stayed wet for a good 30 minutes to help the concrete cure and prevent cracks.
After letting the concrete dry a day, I then went back and sprayed a couple of coats of concrete sealer to ensure this concrete was as waterproof as possible. Whew! That was long, tedious and complex, but the end result is two perfectly level concrete sills for the sliding doors that will be waterproof and last for a long time.
This week was not very glamorous and did not show a lot of progress, but we accomplished a lot. I definitely learned a few new things along the way. The windows and doors should be delivered in a few days. I can’t wait to finally get to the installation phase! Be sure to check in next week to see how the installation goes!
#roseandlilyinteriors #faithfilledinteriors #diydesign #homedecor #diydecor #interiordesign #porch #diyproject #diyprojects #inspiration #roseandlilysunroom #homeinspo #houseinspo


